Wednesday, September 11, 2013

LD27 Ten Seconds of Thrust! - Post Mortem


Finally getting around to doing a postmortem on Ten Seconds of Thrust!  

It is my first Ludum Dare 48hr Solo Compo Entry. (though I've participated in a couple of group game jams and they where a BLAST!) I would have to wait until a 90deg day in Seattle to write this... I'll prob have to clean this post up later (or not).  

Pre-Game - Strategy and Intentions

  • Rapid Game Prototyping Knew I didn't have much time to participate so choose tools that i could get something done solo in little time.
  • Low barrier to Entry - I like the concept of getting something out quickly to showcase a technology and lower the barrier to entry for people who would like to be creative...
  • Ubiquitous to create and play - I'm also using older computer systems so wanted it be playable on almost anything within the browser.
  • Wanted something Visually appealing and interesting play
  • Playable and posted in time allowed

Tools

  • InkScape - awesome and powerful. free vector drawing package (svg) ported to most systems (also exports to png)
  • Stencyl - drag and drop code blocks like MIT scratch, good for beginner (or rusty) programmers. exports game to flash (free) and others (paid).
  • Linux Desktop - free os, with lots of free tools.

Theme Vote and Time 

Not my first choice on a game theme... forgot I had someplace to be on Friday evening so, either cancel it or just go into it knowing I'd only have a limited time to work on things... hence working with tools that can produce something quickly... I've done this before... just not with a game... I can pull this off.... (see Thought to Thing in 1hr or Less) and (Thought to Thing in 2hrs or Less) I didn't even know what the theme was until Late Friday evening.

The Good 

48hr Solo Compo - the good distilled...
  • Total creative control
  • success (or fail) due to your own efforts
  • spend as little (or as much) time on something as you decide
  • no obligations other than to yourself (and those who may play it)
This has possibly turned into...
Rapid Game Prototyping with Stencyl and Inkscape in 8hrs or less...
and now the ramble about the game...
Theme and low time actually worked to an advantage... not knowing what the theme was until late Friday night. having to brainstorm and make a decision quickly and on my own actually worked well. I really couldn't even get to a computer to work on things during a good portion of the compo but that wasn't much of an issue early on. I could see the game play and some of the basic level design already in my head well before sitting down at a computer. so most of the game ended up being (virtually) pre-built before I was able to sit down and actually create it. however, eventually you have to sit down and goto work on things. also knowing I'd have limited time in front of the screen helped me to work with the limited pallet so to speak. prior commitments kept me from spending too much time in front of the computer and forced other activities like... take a walk, fix dinner, visit with friends... having played around extensively in Inkscape and some in Stencyl (particularly in tile creation)... made level design, layout, visualization pretty effortless and fun. after finally getting down to the coding bit... it eventually all started to come back (I'm multi year rusty at coding). was almost as much fun as doing the graphics... got a lot of positive support from GF on tackling (and finishing) my first Solo project... something to show others at our local after LD27 meetup. and talk about at PAX Prime the following weekend.  

The Bad 

The solo compo can be a lonely endeavor... Really missed the group dynamics in game creation.
  • No one to bounce ideas off from
  • coming up with everything on your own
  • no show off what you doing (and get their help/feedback).
  • no one to take up the slack when you are short on time (or talent).
granted I got some feedback from GF... she would have loved to have helped... but nope. Time crunch, lack of sleep... couldn't sleep well Friday night... so had to sleep in on Sat to catch up and be functional. so had a couple of hour to work on things before next time commitment and actually see the sun... got a couple hour in Sat before noon doing graphics, but really didn't get to working on game until late Saturday night... and only for a couple hours at that.  

The Ugly 

Yea...
GF was very supportive in my tackling a solo project... however... she just started new job, so she required TLC. poor communication and scheduling on my part (the game jam is THIS weekend?!). all lead to way too much stress. even without the solo compo or jam it would have been a difficult weekend. and afterward fallout from poor sleep schedule, life stress, etc. ... getting too old for this. my great push to finish the game (just before the deadline) involved having to hack together the timer countdown code... I really need to spend more time in the Stencyl code base to figure stuff out... and not on such a crunch... maybe a few hours a day. don't leave things like this till the last min... or Ten Seconds... as the case may be. oh... and so bloody exhausted that literally botched the after LD27 show and tell... almost didn't make it due to melt down stress.    

ToDo Differently

  • Practice more with Stencyl Coding (hr or so a day till awesome)
  • Schedule more time
  • concrete communication about plans with others
  • do jam instead of solo
  • spend time after compo to polish game (and post)
  • have others playtest during jam/compo

Done Right

  • Tool Choice of Stencyl and Inkscape
  • publish to web
  • waiting a bit before code/build
  • honed Inkscape skills before hand.

  Done Wrong

  • no laptop availability
  • time and personal commitments
  • not enough code familiarity to write w/o extensive research
-L   p.s. as a side note... would do the tiles (and collision detection) differently... I'm prob the only one to find the bug... but collision blocks need to be bigger to keep from allowing your ship to sometimes pass through the wall and end up behind... (would require and complete level and graphics rebuild).

Wednesday, November 14, 2012

BioCharStoveBuild

BioChar Stove Build stuff here...

Contact pages and info currently resided here...

Facebook: http://www.facebook.com/BioCharStoveBuilder
Twitter: http://www.twitter.com/BioCharBBQ
Email: BioCharStoveBuilder@gmail.com

BioChar Stove

Biochar Stove Workshop and workbook stuff here...

Tuesday, June 5, 2012

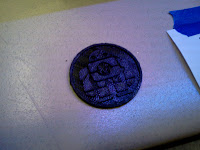
Seattle Mini Maker Faire Robot Coin / Key FOB


2 Color Maker Fair Coin
2 Color Maker Faire Robot Coin
There was a good turnout at the "Thought to Thing in an Hour or Less" workshop at Seattle Mini Maker Faire on Saturday, June 2nd, 2012.

I was there to promote our local Seattle Makerbot/Mendel Users Group (and RepRap) [SMUG(r)], open source 3d printers and users, and our local area Maker Spaces.

T2T 2010
Due to time constraints this workshop was quite a bit less collaborative than the workshop from back in 2010 which was held at Jigsaw Renaissance.

However, we did end up with a 2 Color Maker Faire Robot Coin / Key Fob design in about 45min.

From a group of about 30 people, we had 3 design ideas with the Key Fob option seeming to be the most appropriate coming from someone wearing a black Maker Faire Robot T-shirt.

We quickly went over some of the tools that can be used to design, from OpenSCad, Blender, Google Sketchup, Autodesk 123D,  to Rhino3d (which is what we used).


Going out to the Maker Faire website, we snagged the Maker Faire Robot image from the main page and saved it to our working folder. Here are the steps we went through:
Open up InkScape, import the low resolution image into a new document, and enlarge it by 10x to fill the page after locking the aspect ratio.


Next, select "Trace Bitmap" under the "Path" menu, to bring up the tracing options dialog.

Select Multiple Scans - "Colors", set the colors to "2", check the "Remove Background" and uncheck the "Smooth", and hit the "Update" button, then OK. Close the dialog box to get back to the main document.

Here, we no longer needed the Maker Faire Robot raster image so we deleted it, leaving just the somewhat cartoon-like vector image.

 Under "File" - "Document Properties", bring up a dialog box where you'll select the "Page" tab, then "Resize Page to contents", and click the "Resize Page to Drawing" button before closing the Dialog box.

Saving our work as MakerFaireRobotExport as a standard InkScape SVG (no options) we also used  "Save A Copy" as PDF under the same name to import it into Rhino3d. (You may need to save it as another format, like dxf, to import into OpenSCad or another 3d packages).

In Rhino3d or another format, open up a new file, from preexisting templates, that is already set up to your 3d printers' build platform size. (Mine is a Makerbot Cupcake, so it was 100mm square).

Then select File, Import, to bring up the dialog box, choose PDF under file types, and 'Fit to default screen' on the next dialog. We selected our MakerFaireRobotExport.PDF.

With your import still selected, draw a 4cm circle for your coin/key fob outer rim, and another 1.5mm - 2.0mm circle for the inside coin rim, and use that as a gauge for resizing your vector.
We selected and centered the imported Maker Faire Robot vector to as close to the middle of the coin/key fob as possible.

Resize your vector image by selecting the Scale tool from the bottom. Click the center [0,0,0] as your first point, then click the vector's furthest diameter  out from the center for the second point, and drag the vector to scale so that it fits inside your inner rim (leaving a 1mm gap between the two rims). This is probably a good time to save your work as well.

A 2mm coin this size should print fairly quickly and be strong enough for demonstration purposes, although 3mm would probably be better for strength and durability. 

With your vector image still selected, choose the 'Front' panel window, and use the 'Box' tool tab drop-down to select the 'Extrude Closed Planar Curve' option.

 With the 'Front' panel selected, drag the vector to 1mm in height.


You will be selecting the poly surfaces that you have  just created, and raising them up to 1mm off of your build platform.

Next, you need to make a 2mm high outside ring for your coin/key fob. Select the two outside rings, and repeat the 'Extrude Closed Planar Curve' process again but this time for 2mm high. (It will automatically make a ring rather than a disk, with the two objects selected).

To finish, we selected just the inside circle and extruded it up 1mm, to make a disk that would meet the bottom of our Maker Faire Robot that we previously raised up 1mm.

To finish your coin/key fob model, click the 'Perspective' window panel, then 'Shaded view' toolbox from the top window -  and marvel at what you've created in such a short amount of time.

The model is done now, but you need to get it into a form that your 3d printer will understand, which means converting it from the NURBS, that Rhino3d is working with, into a MESH .stl file that ReplicatorG can then convert into G code for your printer.

Do this by selecting the Polysurfaces you've created, under Edit, Select Objects, PolySurfaces.

Then from the Tools menu, choose Polygon Mesh, From NURBS Object, move the Simple Controls slider down a couple of notches and hit the preview button. Find something that looks like it still holds the shape well, but doesn't have way too many polygons (2 left from center looked good to me), and hit OK.

Click anywhere in a window to deselect all objects, and select only the meshes you've just created by selecting only 'Polygon Meshes, instead of 'Polysurfaces' like you did previously.


If you are just going to print in one color, you should export the whole mesh out as a single file. Under File menu, Export Selected, choose STL as your file type, save, and click OK under the new STL options dialog.

This STL file should theoretically be good to print - just run it through ReplicatorG that is set up to your particular 3d printer.

(For our Maker Faire Robot Coin / Key Fob, this didn't work out to be quite that easy after all, but was able to work it out with some nifty new cloud based tools. SEE BELOW)

Since we had a new handy 2 Color printing Makerbot Replicator available at the Seattle Mini Maker Faire this year thanks to Emmett of Thingivese fame and Makerbot Industries .... we pushed the envelope and decided to go for true 2 Color Printing ( hopefully in under an hour).
2 Color Snap together hack
rather than my old snap together 2 color hack from back in the dinosaur days (2 years ago!)


Moving on to converting our model to a 2 color version...

With all of your models' polygon meshes still selected,  push down the 'Control' key and click the center disk mesh (under your center image), to deselect the background of the coin. You should now have all the meshes selected except for the center disk mesh. You want to export these meshes as a single file now, to print in one color.
Choose File, Export Selected, name it something like ColorOne.stl. and hit OK on the second dialog. Next, you deselect everything (click any blank spot on the perspective window) and just select the small background disk mesh. Export that as above, but name it '...ColorTwo.stl', and hit OK.

These files SHOULD be done. Run them through ReplicatorG and print....

However...
These should have been watertight meshes, but at Maker Faire, something didn't work right and ReplicatorG choked on them.

 Luckily there is a nifty 'Cloud Based' Mesh fixing service on the NetFabb website.
Upload them, running the files through their free service, and download the fixed files.


RepG is then able to use the files and print them up on Emmett's new MakerBot Replicator (named Venus).


For our Maker Faire Robot Coin / Key Fob first print quality turned out better overall on the single color version.


But the 2 Color version looked really cool by far even with the lesser print quality.


It could have had something to do with printing black PLA over clear PLA which may not have bonded well, the singular mesh being more intact, or something gone wrong with the mesh fixing/creation process.

In any case, the 'Experiment' was a success, even though at the event it actually took about an hour and a half to go from Thought to Thing... what with having to Sneaker Net the design files across to the other side of the Maker Faire, and the mesh snafu.

The Seattle Mini Maker Faire Robot Coin / Key FOB design files will reside here on Thingiverse. I'll try and update it with a beefier 3mm version, and beveled version with some draft that could be easily sand cast in metal.

Friday, June 1, 2012

3D Design & Print Workshop - Thought to Thing in an Hour or Less

Location: Seattle Mini Maker Faire (at Seattle Center)
Date: Saturday June 2nd
Time: 2:35 PM to 3:35 PM

An brief introduction to 3d Printing and Design with a Makerbot and/or Rep(St)rap printer.

The workshop will encompass a brief history of open-source Rep(St)rap, printers, their capabilities, and possible future.

We'll quickly go over the steps it takes to design and print from a Rep(St)rap machine.

There will be an "experimental" part of the workshop where the class will collaboratively design a (small) printable object that we'll then
attempt to print out in on a 3d printer at the Maker Faire.

The whole design process from idea, to computer model, to physical object can take less than 1 to 2hrs for simple designs.

The instructor will guide the design process, operate the CAD
software, and then hand the design file over to another Makerbot printer operator.

Prerequisites: Attendees are strongly encouraged to visit
http://www.makerbot.com and http://www.thingiverse.com to gain some knowledge of printing capabilities and possible design ideas.

Due to time constraints we are limited to 15min to come up with a design, 15min to design it, 15min to get the design machine readable, and 15min to print.

After the workshop the collaboratively designed object will reside on Thiniverse for the world to enjoy.

Cheers,

Larry James
Wulf Design

More info See:

Wulf Design - (previous workshop)
http://wulfdesign.blogspot.com/2010/04/thought-to-thing-in-2hrs-or-less-3d.html

Thingiverse
http://www.thingiverse.com/wulfdesign/
http://www.thingiverse.com/thing:2701

SMUG(r) - Seattle Makerbot/Mendel Users Group (and RepRap)
http://groups.google.com/group/seattlemakerbot

FaceBook Page (may change, but search if it does)
http://www.facebook.com/pages/SMUGr-Seattle-MakerbotMendel-Users-Group/204515209658497?bookmark_t=page

Facebook Group
http://www.facebook.com/groups/SMUGr/

Vulcan 3d Printing (Emmitt and his Makerbot 3d Printer)
http://www.thingiverse.com/emmett

Tuesday, August 31, 2010

Near Space Balloon Launch Workshop
I'm in the process of putting together materials for a Near Space Balloon Launch Workshop through Space & Robots. Something I've been wanting to do for some time now. Near the end of the workshop we should be taking some photos like this.

Near Space 05

more news to follow...

Saturday, April 24, 2010

Thought to Thing in 2hrs or Less - 3d Print & Design Workshop

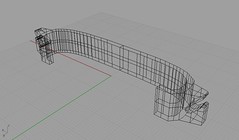
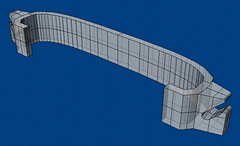
GiPodEarBudCleatGhostedV0.2a
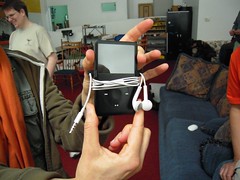
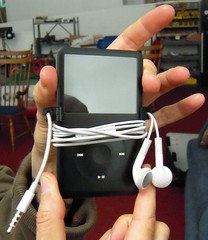
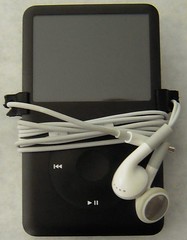
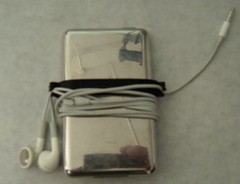
The "iPod Cord Cleat".
Designed by Raven Gildea (design inspiration), Larry James[a.k.a. Wulf Design] (CAD & Print operator), and the other participants of the 3d Print & Design Workshop.

With a Makerbot Cupcake CNC we Collaborative Designed and Printed a "iPod Cord Cleat" in about an hour and a half. One of the participants (Raven Gildea) proposed the design, basic function, and shape. I ran the CAD software and the class gave direction on how to best implement the design and make it functional within the print parameters of the Makerbot.

Having extra sets of minds and eyes helped speed the design process, catching potential errors before the moving on to the printing stage of the workshop.

The first design and print was completely functional after a little clean up with a knife.
Way to go guys!

The design now resides on Thingiverse for anyone whom want to print it out and/or modify the design.

Here are some pictures from the class.

AiPodEarBudCleatV0.1JigSawSpaceFull

BiPodEarBudCleatV0.1JigSawSpaceCrop

CiPodEarBudCleatV0.1wtBkGrndwPod

DiPodEarBudCleatV0.1backBlur

EiPodEarBudCleatV0.1viewB

FiPodEarBudCleatV0.1viewA

HiPodEarBudCleatWireFrameV0.2