|
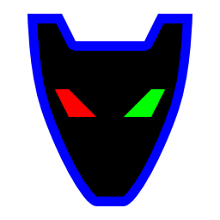
| 2 Color Maker Faire Robot Coin |
There was a good turnout at the "
Thought to Thing in an Hour or Less" workshop at
Seattle Mini Maker Faire on Saturday, June 2nd, 2012.
I was there to promote our local
Seattle Makerbot/Mendel Users Group (and RepRap) [SMUG(r)], open source 3d printers and users, and our local area Maker Spaces.
 |
| T2T 2010 |
Due to time constraints this workshop was quite a bit less collaborative than the
workshop from back in 2010 which was held at
Jigsaw Renaissance.
However, we did end up with a 2 Color Maker Faire Robot Coin / Key Fob design in about 45min.
From a group of about 30 people, we had 3 design ideas with the Key Fob option seeming to be the most appropriate coming from someone wearing a black Maker Faire Robot T-shirt.
We quickly went over some of the tools that can be used to design, from
OpenSCad,
Blender,
Google Sketchup,
Autodesk 123D, to
Rhino3d (which is what we used).

Going out to the
Maker Faire website, we snagged the
Maker Faire Robot image from the main page and saved it to our working folder. Here are the steps we went through:
Open up
InkScape, import the low resolution image into a new document, and enlarge it by 10x to fill the page after locking the aspect ratio.
Next, select "Trace Bitmap" under the "Path" menu, to bring up the tracing options dialog.
Select Multiple Scans - "Colors", set the colors to "2", check the "Remove Background" and uncheck the "Smooth", and hit the "Update" button, then OK. Close the dialog box to get back to the main document.
Here, we no longer needed the Maker Faire Robot raster image so we deleted it, leaving just the somewhat cartoon-like vector image.
Under "File" - "Document Properties", bring up a dialog box where you'll select the "Page" tab, then "Resize Page to contents", and click the "Resize Page to Drawing" button before closing the Dialog box.
Saving our work as MakerFaireRobotExport as a standard InkScape SVG (no options) we also used "Save A Copy" as PDF under the same name to import it into Rhino3d. (You may need to save it as another format, like dxf, to import into OpenSCad or another 3d packages).
In Rhino3d or another format, open up a new file, from preexisting templates, that is already set up to your 3d printers' build platform size. (Mine is a Makerbot Cupcake, so it was 100mm square).
Then select File, Import, to bring up the dialog box, choose PDF under file types, and 'Fit to default screen' on the next dialog. We selected our MakerFaireRobotExport.PDF.
With your import still selected, draw a 4cm circle for your coin/key fob outer rim, and another 1.5mm - 2.0mm circle for the inside coin rim, and use that as a gauge for resizing your vector.
We selected and centered the imported Maker Faire Robot vector to as close to the middle of the coin/key fob as possible.
Resize your vector image by selecting the Scale tool from the bottom. Click the center [0,0,0] as your first point, then click the vector's furthest diameter out from the center for the second point, and drag the vector to scale so that it fits inside your inner rim (leaving a 1mm gap between the two rims). This is probably a good time to save your work as well.
A 2mm coin this size should print fairly quickly and be strong enough
for demonstration purposes, although 3mm would probably be better for
strength and durability.
With your vector image still selected, choose the 'Front' panel window, and use the 'Box' tool tab drop-down to select the 'Extrude Closed Planar Curve' option.
With the 'Front' panel selected, drag the vector to 1mm in height.
You will be selecting the poly surfaces that you have just created, and raising them up to 1mm off of your build platform.
Next, you need to make a 2mm high outside ring for your coin/key fob. Select the two outside rings, and repeat the 'Extrude Closed Planar Curve' process again but this time for 2mm high. (It will automatically make a ring rather than a disk, with the two objects selected).
To finish, we selected just the inside circle and extruded it up 1mm, to make a disk that would meet the bottom of our Maker Faire Robot that we previously raised up 1mm.
To finish your coin/key fob model, click the 'Perspective' window panel, then 'Shaded view' toolbox from the top window - and marvel at what you've created in such a short amount of time.
The model is done now, but you need to get it into a form that your 3d printer will understand, which means converting it from the NURBS, that Rhino3d is working with, into a MESH .stl file that ReplicatorG can then convert into G code for your printer.
Do this by selecting the Polysurfaces you've created, under Edit, Select Objects, PolySurfaces.
Then from the Tools menu, choose Polygon Mesh, From NURBS Object, move the Simple Controls slider down a couple of notches and hit the preview button. Find something that looks like it still holds the shape well, but doesn't have way too many polygons (2 left from center looked good to me), and hit OK.
Click anywhere in a window to deselect all objects, and select only the meshes you've just created by selecting only 'Polygon Meshes, instead of 'Polysurfaces' like you did previously.
If you are just going to print in one color, you should export the whole mesh out as a single file. Under File menu, Export Selected, choose STL as your file type, save, and click OK under the new STL options dialog.
This STL file should theoretically be good to print - just run it through ReplicatorG that is set up to your particular 3d printer.
(For our Maker Faire Robot Coin / Key Fob, this didn't work out to be quite that easy after all, but was able to work it out with some nifty new cloud based tools. SEE BELOW)
Since we had a new handy
2 Color printing Makerbot Replicator available at the Seattle Mini Maker Faire this year thanks to
Emmett of Thingivese fame and
Makerbot Industries .... we pushed the envelope and decided to go for true 2 Color Printing ( hopefully in under an hour).
 |
| 2 Color Snap together hack |
rather than my old
snap together 2 color hack from back in the dinosaur days (2 years ago!)
Moving on to converting our model to a 2 color version...
With all of your models' polygon meshes still selected, push down the 'Control' key and click the center disk mesh (under your center image), to deselect the background of the coin. You should now have all the meshes selected
except for the center disk mesh. You want to export these meshes as a single file now, to print in one color.
Choose File, Export Selected, name it something like ColorOne.stl. and hit OK on the second dialog. Next, you deselect everything (click any blank spot on the perspective window) and just select the small background disk mesh. Export that as above, but name it '...ColorTwo.stl', and hit OK.
These files SHOULD be done. Run them through ReplicatorG and print....
However...
These should have been watertight meshes, but at Maker Faire, something didn't work right and ReplicatorG choked on them.
Luckily there is a nifty 'Cloud Based' Mesh fixing service on the NetFabb website.
Upload them, running the files through their free service, and download the fixed files.
RepG is then able to use the files and print them up on Emmett's new MakerBot Replicator (named Venus).
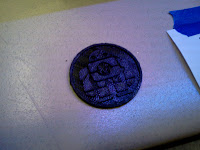
For our Maker Faire Robot Coin / Key Fob first print quality turned out better overall on the single color version.
But the 2 Color version looked really cool by far even with the lesser print quality.
It could have had something to do with printing black PLA over clear PLA which may not have bonded well, the singular mesh being more intact, or something gone wrong with the mesh fixing/creation process.
In any case, the 'Experiment' was a success, even though at the event it actually took about an hour and a half to go from Thought to Thing... what with having to Sneaker Net the design files across to the other side of the Maker Faire, and the mesh snafu.
The Seattle Mini Maker Faire Robot Coin / Key FOB design files will reside here on
Thingiverse. I'll try and update it with a beefier 3mm version, and beveled version with some draft that could be easily sand cast in metal.


 For our Maker Faire Robot Coin / Key Fob first print quality turned out better overall on the single color version.